...
Nachtrag - irgendwie ist wurde nach dem Bearbeiten der richtige Link nicht angezeigt, sondern der alte. Behoben.
...
Danke.
...
Nachtrag - irgendwie ist wurde nach dem Bearbeiten der richtige Link nicht angezeigt, sondern der alte. Behoben.
...
Danke.
Mh, da muss man ja ein Konto haben, um etwas downloaden zu können.
Schade.
Aber warum wird um diesen Loader so ein Geheimnis gemacht?

Und was hat das dann mit unterschiedlichen Icons zu tun
In der Taskleiste wird der gestartetet Fx angezeigt, egal mit welchem Profil.
Es ist ein Wunder geschehen, der Herr hat Hirn regnen lassen!
Eben ist der Groschen gefallen, es geht um die angezeigten Icons der aktiven Instanzen.
Autsch.
Wenn man in Firefox about:profiles eingibt, kann man dort zusätzlich zu dem gerade aktiven Profil
weitere starten.
Ich habe drei Profile und die laufen gerade paralel!
Es muss doch möglich sein, über ein Skript (AutoIt), PowerShell, Batch oder was auch immer,
auf diese Funktion, ein Profil direkt zu starten, zuzugreifen.
Ich finde diese Diskussion sehr, sehr interessant.
Wenn man mehrere Profile hat, lässt sich da nicht etwas mit Verknüpfungen und Parametern machen?
In der profiles.ini sind ja die Pfade eingetragen, auch welches Profil als Standard definiert ist,
und Verknüpfungen kann man ja eigene Icons zuweisen.
Ist nur so ein Gedanke, wahrscheinlich aber der Holzweg oder gar eine Sackgasse.
Einen Link zu Seiten, die das betreffen, hast Du nicht?
Oder ist es grundsätzlich egal welche Seiten aufgerufen werden und es ist ein zeitliches Phänomen?
Mein Problem auf meinem Rechner scheint übrigens nicht ausschließlich von MSEdgeRedirect zu kommen.
Auf einem meiner anderen Rechner funktioniert das problemlos.
...
Kleiner Nachtrag:
Gerade eben habe ich den Edge auf die neueste Version upgedatet - jetzt funktioniert alles wieder wie gewünscht. Damit ist die Ursache des Problem auch klar.
Damit ist die Ursache des Problem auch klar.
Mh,
die Popups kannst Du zum Großteil mit I don't care about cookies und/oder I still don't care about cookies
loswerden, aber was es mit den im Hintergrund gelöschten Cookies angeht, bin ich jetzt auch am Ende.
Wobei, wenn ich dieses Fenster einfach schließe und kurz drauf doch wieder camp-firefox aufrufe,
muss ich mich auch wieder anmelden.
Habe mir da noch nie einen Kopf drüber gemacht.
Ok, so weit, so gut.
Erkläre mir noch ein mal genau, wo das Problem ist.
Sind es diese Popups, die Du bestätigen musst?
Oder ist es so, dass Du Dich immer auf Webseiten, wo Du schon einmal Eingelogt bist/warst,
nach einem erneuten Aufruf der Seite, Dich wieder, erneut, einloggen musst?

Nochmal Firefox bereinigen oder nochmal neu installieren oder Fehlerbehebungsmodus oder....?
Was kann ich machen?

Gib doch mal bitte about:preference in die Adresszeile ein, Enter!
In das Suchfeld dann cookies.
Danach scrollst Du nach unten und schaust, wie unter "Cookies und Webseiten-Daten"
der Punkt "Cookies und Webseiten-Daten beim Beenden von Firefox löschen" eingestellt ist!
Ein weiterer Punk ist, welche Erweiterungen sind installiert?
Ist da etwas dabei, was Cookies beeinflussen könnte?
Gib in die Adressleiste about:addons ein, Enter.
Mach mal bitte Screenshots von den aktiven Addons und stelle die Bilder hier ein.

Man ersetze alle collapsed durch hidden, dann sollte es wieder funktionieren.
Funktioniert. Danke.
Habe Dich verewigt und einen Link hierher gesetzt.
// ==UserScript==
// @name           openbookModoki.uc.js
// @namespace      https://github.com/Endor8/userChrome.js/blob/master/openbookmodoki/OpenBookModoki.uc.js
// @description    Lesezeichen Bearbeiten Panel: Veränderbare Panelgröße hinzugefügt. Schlüsselwort und Ordner-Struktur
// @description    Felder sind geschlossen. Weitere Einstellungen: Beschreibung, Ordner, Dieses Lesezeichen in der Sidebar laden,
// @description    und Schlüsselwort können ein-/ausgeblendet werden.
// @include        main
// @source         https://www.camp-firefox.de/forum/thema/135858-skript-openbookmodoki-funktioniert-nicht-mehr/?postID=1218464#post1218464
// @author         Alice0775
// @version        2023/01/27 14:30 Fx109 by Sören Hentzschel
// @version        2020/05/11 10:30 Fx76 by aborix
// @version        2018/03/15 10:30 Fx59 by aborix
// @version        2017/11/17 02:30 Fx57
// @version        2016/03/20 02:30 remove tst hack
// @version        2015/08/31 02:30 Fx40
// @version        2013/07/07 02:30 fix onFolderMenuListCommand
// @version        2012/12/08 22:30 Bug 788290 Bug 788293 Remove E4X
// @version        2012/07/24 14:30 Bug 761723 implement toString of function objects by saving source
// @version        2010/12/06 10:30 Bug Bug 597557 - Bookmarks & Identity panels should use an Arrowpanel
// @version        2010/04/01 00:00 Bug 556342  - Invalid Treeview in bookmark menu via star pane
// @version        2009/12/22 00:00 namePicker in front
// @version        2009/12/21 14:00 BETTER WORKAROUND FIX  Bug 536024 -  When i expand folder-tree on Edit This Bookmark, the bookmarked folder is changed.
// @version        2009/12/20 16:00 WORKAROUND FIX  Bug 536024 -  When i expand folder-tree on Edit This Bookmark, the bookmarked folder is changed.
// @version        2009/08/11 18:00 Tree Style Tab0.8.2009081101 Unterstützung für das Umbenennen von Objekten
// @version        2009/08/07 00:00 Tree Style Tab0.8.2009073102 Treestyletab-Tabzeile ausblenden, wenn vorhanden
// @version        2009/08/06 19:00 Tree Style Tab0.8.2009073102 Problem, dass der übergeordnete Tab für einen Moment angezeigt wird, behoben
// @version        2009/08/06 18:00 Tree Style Tab0.8.2009073102 entsprechend
// @version        2009/06/24 00:00 Firefox3.5 Es wurde ein Fehler behoben, durch den der Offen / Geschlossen Status des Expanders in der
// @version        2009/06/24 00:00 Ordnerstruktur und der Tag-Auswahl nicht gespeichert wurde
// @version        2009/01/02 02:00 Beschreibung, Position, loadInSidebar, Schlüsselwort und Einstellung anzeigen / ausblenden
// @version        2009/01/01 22:28
// ==/UserScript==

var openbookResizer = {

  drag  : false,
  height: null,
  width : null,
  eventOffset: null,
  timer: null,
  PREHIDEROW    : "userChrome.openbook.hideRow",  // description, location, loadInSidebar, keyword
  PREFTREEHEIGHT: "userChrome.openbook.treeHeight",
  PREFTREEWIDTH : "userChrome.openbook.treeWidth",
  PREFOPENTREE  : "userChrome.openbook.openTree",
  PREFOPENTAG   : "userChrome.openbook.openTag",

  get tree(){
    return gEditItemOverlay._folderTree;
  },

  get getHideRow(){
    try {
      return Services.prefs.getCharPref(this.PREHIDEROW).replace(/\s/g,'').slice(',');
    } catch(e) {
      return [];
    }
  },

  get getPrefTreeHeight(){
    try {
      return Services.prefs.getIntPref(this.PREFTREEHEIGHT);
    } catch(e) {
      return 150;
    }
  },
  get getPrefTreeWidth(){
    try {
      return Services.prefs.getIntPref(this.PREFTREEWIDTH);
    } catch(e) {
      return 250;
    }
  },

  get editBookmarkPanel(){
    return StarUI.panel;
  },

  get treeExpander(){
    return gEditItemOverlay._element('foldersExpander');
  },

  get tagExpander(){
    return gEditItemOverlay._element('tagsSelectorExpander');
  },

  get getPrefOpenTree(){
    try {
      return Services.prefs.getBoolPref(this.PREFOPENTREE);
    } catch(e) {
      return false;
    }
  },

  get getPrefOpenTag(){
    try {
      return Services.prefs.getBoolPref(this.PREFOPENTAG);
    } catch(e) {
      return false;
    }
  },

  init: function(){
    //window.removeEventListener('load', this, false);
    window.addEventListener('unload', this, false);

    var style = " \
      .openbookResizerGripper { \
        list-style-image: url('data:image/png;base64,iVBORw0KGgoAAAANSUhEUgAAAAwAAAAMCAYAAABWdVznAAAApklEQVQokY3QK4uCURCA4QeDLCoIXoIYNFiUFVZBq2JQEEx+UcTmpi1b121eosX/a5lg8jvTzsy8M+8cGGKNusQY44QMlRTgAzOcsUqBitH0FVCWpzeNpmZsytUb4oY9qil6BfRxDaiZp1eO5OBl01u9JX7QxiRFr4XfmNbFZ+gdojbCBbt4a6CDP/wH1McDR9SwwB1b+I4bejG1ER8xxwaluHOJ8RM+9xjk9q2RpwAAAABJRU5ErkJggg=='); \
        cursor: sw-resize; \
      }";
    var sspi = document.createProcessingInstruction(
      'xml-stylesheet',
      'type="text/css" href="data:text/css,' + encodeURIComponent(style) + '"'
    );
    document.insertBefore(sspi, document.documentElement);
    sspi.getAttribute = function(name) {
    return document.documentElement.getAttribute(name);
    };

    this.folderTreeRow   = "folderTreeRow";
    this.tagsSelectorRow = "tagsSelectorRow";

    gEditItemOverlay.initPanel_org = gEditItemOverlay.initPanel;
    gEditItemOverlay.initPanel = function(aInfo) {
      aInfo.hiddenRows = openbookResizer.getHideRow;
      gEditItemOverlay.initPanel_org(aInfo);
    }

    // selected tree visible
    func = gEditItemOverlay.toggleFolderTreeVisibility.toString();
    func = func.replace(
      'var currentFolder = this._getFolderIdFromMenuList();',
      ''
    );
    func = func.replace(
      /expander.className = "expander-up";*/,
      'var currentFolder = this._getFolderIdFromMenuList(); \
      var onselect = this._folderTree.getAttribute("onselect"); \
      this._folderTree.removeAttribute("onselect"); \
      $&;'
    );
    func = func.replace(
      'this._folderTree.focus();',
      '$&; \
      setTimeout(function(tree){ \
        var start = new Object(); \
        var end = new Object(); \
        var numRanges = tree.view.selection.getRangeCount(); \
        if (numRanges > 0) { \
          tree.view.selection.getRangeAt(0,start,end); \
          var v = start.value; \
          tree.treeBoxObject.ensureRowIsVisible(v); \
        } \
        tree.setAttribute("onselect", onselect); \
      }, 0, this._folderTree);'
    );
    try{
      gEditItemOverlay.toggleFolderTreeVisibility = new Function(
         func.match(/\((.*)\)\s*\{/)[1],
         func.replace(/^function\s*.*\s*\(.*\)\s*\{/, '').replace(/}$/, '')
      );
    } catch(ex){}

    // selected tree visible
    func = gEditItemOverlay.onFolderMenuListCommand.toString();
    func = func.replace(
      'this._folderTree.selectItems([container]);',
      '{var onselect = this._folderTree.getAttribute("onselect"); \
      this._folderTree.removeAttribute("onselect"); \
      $&; \
      setTimeout(function(tree){ \
        var start = new Object(); \
        var end = new Object(); \
        var numRanges = tree.view.selection.getRangeCount(); \
        if (numRanges > 0) { \
          tree.view.selection.getRangeAt(0,start,end); \
          var v = start.value; \
          tree.treeBoxObject.ensureRowIsVisible(v); \
        } \
        tree.setAttribute("onselect", onselect); \
      }, 0, this._folderTree);}'
    );
    try{
      gEditItemOverlay.onFolderMenuListCommand = new Function(
         func.match(/\((.*)\)\s*\{/)[1],
         func.replace(/^function\s*.*\s*\(.*\)\s*\{/, '').replace(/}$/, '')
      );
    } catch(ex){}

    this.editBookmarkPanel.addEventListener('popupshowing', this, false);
    this.editBookmarkPanel.addEventListener('popupshown', this, false);
    this.editBookmarkPanel.addEventListener('popuphiding', this, false);
  },

  uninit: function(){
    window.removeEventListener('unload', this, false);
    this.editBookmarkPanel.removeEventListener('popupshowing', this, false);
    this.editBookmarkPanel.removeEventListener('popupshown', this, false);
    this.editBookmarkPanel.removeEventListener('popuphiding', this, false);
  },

  handleEvent: function(event){
    switch(event.type){
      case 'unload':
        this.uninit();
        break;
      case 'popupshowing':
        this.popupshowing(event);
        break;
      case 'popupshown':
        this.popupshown(event);
        break;
      case 'popuphiding':
        this.popuphiding(event);
    }
  },

  popuphiding: function(event){
    if (this.editBookmarkPanel != event.originalTarget)
      return;
    var state = !gEditItemOverlay._element(this.folderTreeRow).hidden;
    Services.prefs.setBoolPref(this.PREFOPENTREE, state);
    var state = !gEditItemOverlay._element(this.tagsSelectorRow).hidden;
    Services.prefs.setBoolPref(this.PREFOPENTAG, state);

    gEditItemOverlay._element(this.folderTreeRow).hidden = true;
    gEditItemOverlay._element(this.tagsSelectorRow).hidden = true;
  },

  popupshowing: function(event){
    if (this.editBookmarkPanel != event.originalTarget)
      return;

    this.tree.height = this.getPrefTreeHeight;
    //this.tree.width = this.getPrefTreeWidth;
    //this.editBookmarkPanel.width = this.getPrefTreeWidth;

    if (!document.getElementById("openbookResizerbottomBox")) {
      var panel = StarUI.panel;

      var innerarrow = panel.openOrClosedShadowRoot.querySelector('.panel-arrowcontent');
      if (innerarrow)
        innerarrow.setAttribute('flex', 1);

      var box = document.createXULElement("hbox");
      box.setAttribute('id', 'openbookResizerbottomBox');
      box.setAttribute('align',"start");

      var resizer = document.createXULElement("image");
      resizer.setAttribute("class", "openbookResizerGripper");
      resizer.setAttribute('onmousedown', 'openbookResizer.mousedown(event)');

      box.appendChild(resizer);
      panel.appendChild(box);

      panel.setAttribute('onmousemove', 'openbookResizer.mousemove(event)');
      panel.setAttribute('onmouseup', 'openbookResizer.mouseup(event)');
    }
  },

  popupshown: function(event){
    if (this.editBookmarkPanel != event.originalTarget)
      return;
    setTimeout(function(self) {
      if (self.getPrefOpenTree &&
          gEditItemOverlay._element(self.folderTreeRow).hidden ) {
        gEditItemOverlay.toggleFolderTreeVisibility();
      }
      if (self.getPrefOpenTag &&
          gEditItemOverlay._element(self.tagsSelectorRow).hidden ) {
        gEditItemOverlay.toggleTagsSelector();
      }
      try {
        gEditItemOverlay._element(Services.prefs
          .getCharPref("browser.bookmarks.editDialog.firstEditField")).focus();
      } catch(e) {}
    }, 100, this);
  },

  mousedown: function(event){
    this.drag = true;
    this.height = parseInt(this.tree.boxObject.height);
    this.width = parseInt(this.editBookmarkPanel.boxObject.width);
    this.eventOffset = event;
  },

  mousemove: function(event) {
    if (this.timer)
      clearTimeout(this.timer);
    this.timer = setTimeout(function(event, self){
      if (self.drag) {
        // make sure height [150,screen-300] and width is [300,screen-50]
        var newValue;
        newValue = self.height + event.pageY - self.eventOffset.pageY;
        if (newValue <= screen.height - 300 && newValue >= 150) {
          self.tree.height = newValue;
        }
        newValue = self.width - event.pageX + self.eventOffset.pageX;
        if (newValue <= screen.width - 50 && newValue >= 300) {
          //self.tree.width = newValue;
          self.editBookmarkPanel.width = newValue;
        }
      }
    }, 10, event, this);
  },
  mouseup: function(event) {
    if (this.drag) {
      Services.prefs.setIntPref(this.PREFTREEHEIGHT, this.tree.height);
      Services.prefs.setIntPref(this.PREFTREEWIDTH, this.editBookmarkPanel.boxObject.width);
    }
    this.drag = false;
  }
}
//window.addEventListener("load", openbookResizer, false);
openbookResizer.init();Der ist doch ellenlang, all meine Programme. Das könnt ihr doch nicht meinen, oder?
Doch. Genau den ellenlangen Text, der all' Deine Programme umfasst!
Ich mach' das mal.
1. Auf Bearbeiten gehen, dann alles Auswählen.
2. Auf die Diskette klicken, der neuen Datei einen Namen geben und
deren Inhalt hier online stellen.
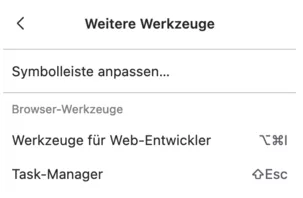
Das Design hat FuchsFan angepasst, aber die Überschrift ist standardmäßig „Browser-Werkzeuge“:
Die Symbole hinter den Einträgen sind ja cool! Anstatt Strg+Umschalt+I, selbst entworfen und umgesetzt?

Im Hamburger auch "Browser-Werkzeuge".
Hast Du das so gemacht?
Für mich sind die Browser-Werkzeuge ganz explizit die Browser-Werkzeuge,
das Menü, welches diese freigibt und auch die anderen "Tools" d.h. bei mir jetzt
einheitlich Weitere-Werkzeuge.
Kann und darf ja jede(r) machen, wie er/sie will.
Und es ist ja nicht so, als hättest du nicht auch schon Fragen in Themen gestellt, die jemand anderes eröffnet hat…
Stimmt, aber, das ist ja was anderes. ![]()
Schon interessant, wie verschieden die Menschen doch mit der Software umgehen!
Ich würde nie im Leben auf die Idee kommen, über die Taskleiste ein Programm zu schließen.
Hallo Luna-1
nach dem Du amazon.de in der FRITZ!box auf die Liste "Gesperrte Internetseiten" gesetzt hast,
musst Du selbstverständlich auch den Netzwerkverkehr für Deinen Rechner noch konfigurieren!
Unter Heimnetz/Netzwerk suchst Du Deinen Rechner, klickst auf den Stift (Bearbeiten).
Es öffnet sich ein neues Fenster, scrollst etwas nach unten und findest "Kindersicherung".
Dieser Eintrag steht wahrscheinlich auf Unbeschränkt,
bitte auf Standard ändern.
Und schon ist von Deinem Rechner die Page von Amazon nicht mehr zu erreichen.
Seit einiger Zeit nervte es mich, dass es unter "Extra" Browser-Werkzeuge
und im "Hamburgermenü" Weitere-Werkzeuge hieß.
Ich habe nun ein wenig Zeit gebraucht um, unter "Extra" das Label zu ändern.
Und hier der CSS-Code dafür.
    /* Text geändert im Extramenü */

    #browserToolsMenu {
        font-size: 0px !important;
        height: 22px !important;
        min-width: 100px !important;
        max-width: 260px !important;
        background-repeat: no-repeat !important;
        background-position: 12px 3px !important;
        background-size: 16px 16px !important;
    }
    #browserToolsMenu::before {
        padding-left: 12px !important;
        content: "Weitere Werkzeuge " !important;
        font-size: 12px !important;
}Mit den Werten muss/kann jeder ja noch etwas herumspielen, damit es dann passt.
Ich finde es echt schade, dass nun dieser Thread so zerpflückt wurde.
OK, es wurden für einige wichtige Fragen beantwortet, aber hätte man das nicht in einem separaten Thread klären können?
Wer würde denn das CSS oder das Script denn jetzt finden, wenn er nach solch einer Lösung suchen würde?
Soll betreffende Person den ganzen Thread durchackern?
Naja, ist halt jetzt so.